Wednesday, June 20, 2007
Monday, May 28, 2007
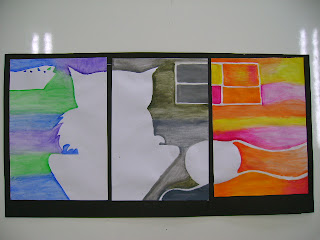
Nagative spaces

On Wensday i have finished my negative spaces art work and it was a nice piece of art. I work really hard on it. A negative space art is a art the we only paint/color in the negative spaces and leave the positive spaces blank. This activity was very fun. The thing that i want to improve on the art work is the mistake that i did if i had more time i will do it again so it won't have any mistake. Also i want to improve the sticking when i am mounting the art.
How to do a Negative art work:
1. draw the margin about 1 cm.
2. draw a outline picture ( on the draft)
3. spits the picture into 3 pieces ( on the draft)
4. Plan the color of each paper ( it would have to be a tone of color like complimentary, warm, ETC. Also non of the color tomes should be the same for the 3 pieces)
5. On the real paper draw the picture on the plan very soft on the paper so when we finish painting we won't see the lines
6. Now start to paint, do like you have planed.Make sure on the paper there is water so you will paint on water and you can blend the colors eaily too. Also Make sure the positive spaces have no color in it.
7.Wait for it to dry.
8. Stick the 3 paper on a color paper( 3 paper on one paper) make sure you leave some spaces between the 3 pieces.
9. You will get a finish painting.
From looking at my friends work i think this time i did an OKAY job, but i can still do better if i had more time. I still want to do some of the three pieces again still.
Tuesday, March 27, 2007
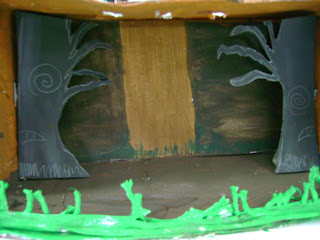
Mini Stage

In the Art class i made a mini stage of the myth or ledgend called The Adventures of Ulysses. The part from the book The Adventures of Ulysses was when Ulysses and his mens go climbed the giant's foot and all his mens got eaten but Ulysses survived.For my stage i colored the stage dark brown, so i will go with the part i'm doing. I choose this story because i know it because i read it and i know the details of this story then the other story i know.For the back drop i draw a giant's feet that looks like a tree, for the back ground of the backdrop i also made it dark brown and in the back drop every thing was dark a scary. For the wings i used the black cardboard and cut it out as bkack dead trees. For the grass in front of the stage i used green cardboard and some strings to do them. For the grass i made them by sticking the strings to the cardboard and then paint it green. I also made some decorations by using strings. For the decorations i did it by putting the string in the glue and then paint many colors on the strings, then put it on and around the stage to make it more like a forest.
How to make a mini stage:
1. Get a box about 35 cm
2. Get glue and paper to do paper mache around the box( no need to do the bottom part)
3. After that wait for it to dry and then mkae the backdrop(background)
4.Paint the box the color you want it to be
5.Make the wings( wings is the thing that is at the left and right of the stage)
6. Make something low in front like grass.
Optional 7. Decorate it
For Example if your stage is having a party you can put some ribbons on your stage so it looks more like a party.
In my opinion i like this project it was fun. I think if i need to do something like this again i would try to make the paper i need to stick the box in the first step more neat.

Thursday, March 01, 2007
Reflection 1/3/07

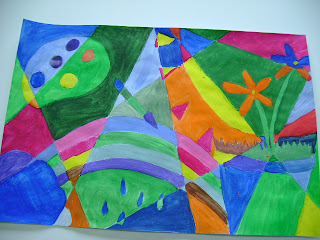
Last week i have finish my painting. It was Paul klee's style. It came out good but someparts of the painting was alittle bit messy. Anyway it wasn't that bad. Over all i think that doing this painting was fun. it was quite easy to do it. For this art i think the easy part was designing and organizing the colors, the hard part was when we started to paint because i have to try and make it neat. The good thing about this activity is that we get to practice controling our brush. I don't think there are any bad points.
On this art i had 7 pictures on it and they were flower, rainbow, cloud, paint brush, color plate, and some water drops. I choose the flower because it is like the espresion of happiness. I choose the rainbow because i think it like we have a colorful life, and i choose cloud because it is like peace. I choose the paint brush because i like to paint at home and the color plate because when we paint we need touse it. I choose the water drop because we use it everyday in our life.
For me when i look at other people's i think they did alot better then me, like Nsmfon, Pim, Kik and Aey they did so good .It makes me want to do this work again because i think i did not do a good work enough.I think that the project that we have to do a collage, 20 square and a abtract painting i did alot better. I think i can improve this painting by taking more time on it and controlong my brush better.
How to make this painting?
1.Draw border just a straight line in the size of a ruler and then a Draw 5-9 lines on the paper it can be straight curved lines it can be any knid of line but every line have to end at the edge of the paper.
2.Draw some pictures on the paper( about 7+) in every box on the paper has to have a picture on it.
3. Photo copy it.
4.On the photo copy one plan the colors, you should not put 2 same color beside each other and do not use black or white in this painting.
5.On the other one that you used to photo copy you start to paint on it and when u finsh painting make sure that you can't see any pencil lines. It should be neat as possible.
6. When u finsh wait for it to dry.
7.When it is dry cut on the border line you drew at first out.
8. You get a finish painting
Thursday, January 25, 2007
Term 2, Week 3
Today i Finish planing the colors fro my art work. To plan the colors was the easy part but the painting is the hard part because i don't paint so well and i like to paint out of the lines. I started to paint alittle bit for the art work. I think it was fun.
Wednesday, January 10, 2007
Term 2 Week 1
Today in art class Mr. Pat gave an assignment to make a picture using the Paul Klee's idea of painting technique.
The painting was kind of like a grid with picture on it. Mr Pat told us to Draw pictures the discribe ourselfs. On my Draft I draw a clould with rainbow, Sun, painting pad, Paint brush, Drop od water, and a Flower pot with flowers in it. In my opinion I was quite easy and i think it will be harder when we start to paint. I will have to concentrate alot while painting cause in every grid box which have a picture inside will have to not be the same color even though it's the same picture.
The painting was kind of like a grid with picture on it. Mr Pat told us to Draw pictures the discribe ourselfs. On my Draft I draw a clould with rainbow, Sun, painting pad, Paint brush, Drop od water, and a Flower pot with flowers in it. In my opinion I was quite easy and i think it will be harder when we start to paint. I will have to concentrate alot while painting cause in every grid box which have a picture inside will have to not be the same color even though it's the same picture.
Wednesday, December 06, 2006
Portrait
Today in art class we use paint to paint a protrait. For the wash on my portrait i use purple. I use brown to paint my face,hair, and other details. I was fun and i want to paint aother one but the 2 periods nearly ended so we clean up. In this class i think i painted my self quite nice because normaly i can't paint a picture of my self this nice.
